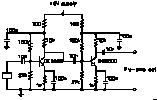
For the pre-amplifier I chose to use two simple transistor stages instead of the two original opamps. For the headphone amplifier I used a LM386, because I want to use low-impedance headphones instead of a high-impedance earpiece.
I also have some experimental, ultra-simple, designs here.
Frequency division detector parts
From the left to the right, it contains:- A 40 kHz ultrasonic piezo transducer. Make sure that you connect the pin connected to the case to ground.
- Two identical transistor stages for amplification. The transistors are BC550, which are low noise versions of the standard BC547 NPN transistors. This is a standard transistor amplification stage: resistors 27k and 150k set the DC bias, the 1k resistor then sets the current and the 10k resistor sets the gain. The emitter is decoupled by a 100nF capacitor The transistor stages have a power supply decoupling consisting of a 100 Ohm resistor and a 100nF capacitor. The gain should be about 120x for each stage.
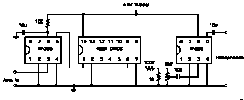
- A LM386 (pdf) opamp. This opamp needs very little external components and gives a output DC bias nicely centered around half the power supply voltage. If you need more gain, you can boost it by adding a series connection of a capacitor and a resistor across pins 1 and 8 (the pins on the left). Look into the datasheet of the LM386 for more details on this. The opamp has a power supply decoupling consisting of a 100 Ohm resistor and a 10uF capacitor.
- A 4024 (pdf) CMOS IC which performs the actual frequency division. It is set to 16 times division.
- A potentiometer to set the volume to the earphones. Instead of a 2k2 potmeter parallelled by a 1k resistor I think it's better to use a 1k potmeter without a parallel 1k resistor. Make sure that you use a logarithmic potmeter and wire it the correct way !
- Another LM386 opamp to give enough power to drive headphones or a speaker. The output is connected to a 3.5 mm stereo jack. The connections for left and right on the jack bus have been connected, so the speakers are in parallel.
The schematic is split up in two parts, the pre-amplifier (left) and the rest of the circuit (right):

 Across the supply I connected a 100uF capacitor for noise reduction and
power stabilisation (not shown on the picture).
Across the supply I connected a 100uF capacitor for noise reduction and
power stabilisation (not shown on the picture).I used 4 1.5V penlite batteries for this circuit. As far as I can remember the circuit draws about 12 mA of current, so it should be able to run over 160 hours on alkaline batteries.
I soldered the circuit on a piece of single solder island perforated board and put it in a case slightly larger than a TV remote control. The batteries take up about half the space.
Future enhancements
- The input stage is quite complicated, requiring a lot of components. Perhaps a simple opamp pre-amplifier works better. Although I haven't had any problems, an opamp pre-amplifier should also be more stable with respect to supply voltage and temperature.
- In a future version, I would use a 1k pot for the volume control.
- The LM386 just before the 4024 is perhaps better replaced with a real comparator, with faster response time.
- The coupling cap between the final LM386 stage and the speaker should probably be chosen bigger, something like 100 uF instead of 10 uF.
- Perhaps the use of the LM386 as an output amplifier is overkill, because the output of the circuit is a simple square wave that can be amplified with a low quality amplifier, like a single transistor.
This page was last updated Tuesday, December 28, 1999