First an analytical model of a piezo-electrical transducer is given, then some simulations are shown and finally some practical tips are given for enhancing the response of the transducer.
A substantial part of the ideas on this page have been provided by Willem Hol, who wrote this document + picture. There's also a html-ed version of the same document.
Piezo-electric transducer model
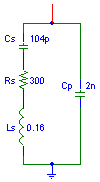
A piezo-electric transducer has a mechanically resonant structure, because of the mass and stiffness of the piezo-electric material. Due to the piezo-electric effect these mechanical properties manifest themselves as electrical equivalent properties, so for example the electrical resonant frequency seen at the electrical terminals is equal to the mechanical resonant frequency. The mechanical mass, stiffnes and damping are represented by a coil, capacitor and a resistor. The electrical equivalent model looks a lot like the well-known model for a crystal, which is a series circuit of a coil (Ls), a capacitor (Cs) and a resistor (Rs), which all are parallelled by a another capacitor (Cp).Impedance
The impedance vs. frequency of the transducer gives a lot of information about the characteristics of the transducer and can be used to find the component values of the equivalent electrical model. Although the electrical equivalent looks very simple, the impedance is rather complex.
Far away from the resonant frequency, Rs, Cs and Ls have
little influence and the impedance equals Cp.
At the series resonant frequency the impedance of Cs and Ls cancel each other,
so the impedance is small and equal to the parallel circuit of Rs and Cp.
Slightly above the resonant frequency, the series circuit Rs/Ls/Cs
looks inductive and can start a parallel resonance with Cp.
This causes a peak in the impedance curve.
Although the electrical equivalent looks very simple, the impedance is rather complex.
Far away from the resonant frequency, Rs, Cs and Ls have
little influence and the impedance equals Cp.
At the series resonant frequency the impedance of Cs and Ls cancel each other,
so the impedance is small and equal to the parallel circuit of Rs and Cp.
Slightly above the resonant frequency, the series circuit Rs/Ls/Cs
looks inductive and can start a parallel resonance with Cp.
This causes a peak in the impedance curve.This picture gives a good idea of the impedance vs. frequency and response vs. frequency for a 40 kHz transducer.
Using some simple analytical approximations, the values of the equivalent electrical components be derived from the picture. The value of Cp can be found by looking at the impedance just below and above the resonance peaks. The value of Rs can be found by looking at impedance at series resonance. The value of Cs can be found by observing the frequency difference between series resonance and parallel resonance, then applying the formula Cs=[(fp/fs)^2-1]*Cp. Finally the value of Ls can be calculated from Cs and the series resonance frequency using Ls=1/[(2*pi*fs)^2*Cs].
The following values give a reasonably good approximation: Cp=2 nF, Rs=300 ohm, Cs=104 pF, Ls=160 mH
Response function
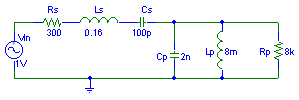
 To determine the response, an AC voltage source is added to the circuit which models the
acoustical stimulus on the circuit.
The series components Rs, Cs and Ls can now be regarded as some kind
of source impedance,
with Cp connected as a load impedance.
To determine the response, an AC voltage source is added to the circuit which models the
acoustical stimulus on the circuit.
The series components Rs, Cs and Ls can now be regarded as some kind
of source impedance,
with Cp connected as a load impedance.The response of this circuit will be discussed in the following section.
Detuning
Natural response
 On the right, the circuit is shown that is used to calculate the natural response of the transducer.
(The 100meg resistor is there to make the simulation program happy about DC conditions
but has virtually no effect on the response.)
On the right, the circuit is shown that is used to calculate the natural response of the transducer.
(The 100meg resistor is there to make the simulation program happy about DC conditions
but has virtually no effect on the response.)The response function is defined here as the voltage over Cp divided the input voltage Vin. Click here for a screenshot showing the response function over a frequency range of 30 kHz to 50 kHz. The bandwidth is approximately 0.5 kHz.
Response with parallel resistor
 Often I have seen that a resistor is connected in parallel with the transducer to dampen
the response.
Often I have seen that a resistor is connected in parallel with the transducer to dampen
the response.Click here for a simulated response function.
The transducer is significantly loaded down by the 1k resistor, still the bandwidth has only increased to approximately 1.5 kHz.
Response with parallel coil
 Another possibility is the addition of a parallel coil.
Click here for a simulated response function.
It can be seen that there are now two resonance peaks, one with a frequency below the original 40 kHz resonance and one above. This seems somewhat counterintuitive, because one would possibly expect that the peak would narrow even more because the parallel combination Cp/Lp has high impedance at 40 kHz and low otherwise.
Now we still have two narrow peaks, which still doesn't look very useful. See what happens when a resistor is added.
Response with parallel coil and resistor
 The resistor can now do its job properly, smoothing out the two peaks into one broad
range of frequencies.
The resistor can now do its job properly, smoothing out the two peaks into one broad
range of frequencies.Click here for a simulated response function.
The bandwidth has increased to 10 kHz with a coil and a resistor connected.
This resistor may partially be provided by the input impedance of the input amplifier. So when you use a pre-amplifier with an input impedance of only 8kohm, you don't even need the parallel resistor.
Choosing Lp and Rp
In the examples given above, no motivation is given for the choice of the components. That will be given here.The coil (Lp) should be chosen such that the resonance frequency of Lp/Cp coincides with Ls/Cs. This gives a two nice symmetrical peaks left and right of the original resonance frequency. Calculate Lp using Lp=1/[(2*pi*fs)^2*Cp].
The resistor (Rp) should be chosen such that the Q of the system is approximately equal to 1. This means that Rp should be calculated using Rp=sqrt(Ls/Cp), where sqrt(.) means taking the square root.
Conclusions/summary
- The best detuning result is obtained by placing both a coil and resistor across the transducer.
- Trying to damp the resonance by connecting only a resistor parallel to the transducer helps very little to broaden the frequency response. The sensitivity suffers greatly though.
- Try to find out Cp in order to be able to calculate Lp. I've seen values of 2 nF for 40 kHz transducers (so a 8.2 mH coil fits nicely) and 2.8 nF for a 24 kHz transducer.
- Transducers with low Cp are preferred, because they present less load on the output and enable better broadening of the resonance peak.
This page was last updated Sunday, January 30, 2000